21. RecyclerView
21.1. About RecyclerView
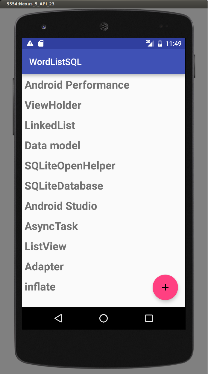
When you display a large number of items in a scrollable list, most of the items aren’t visible. For example, in a long list of words or news headlines, the user only sees a few items at a time.
Or you may have a dataset that changes as the user interacts with it. If you create a new View every time the data changes, that’s a lot of View items, even for a small dataset.
From a performance perspective, you want to conserve memory and save time:
- To conserve memory, minimize the number of View items that exist at any given point.
- To save time, minimize the number of View items you have to create. To accomplish both these goals, create more View items than the user can see on the screen and cache the created View items. Then reuse the View items with different data as list items scroll in and out of the display.
The RecyclerView class is a more advanced and flexible version of ListView. It’s a container for displaying large, scrollable data sets efficiently by maintaining a limited number of View items.
Use RecyclerView when you need to display a large amount of scrollable data, or data collections whose elements change at runtime based on user action or network events.
21.2. RecyclerView components
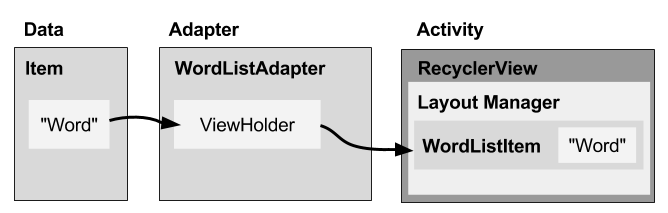
To display data in a RecyclerView, you need the following (refer to the figure below):
- Data. It doesn’t matter where the data comes from. You can create the data locally, as you do in the practical, get it from a database on the device as you will do in a later practical, or pull it from the cloud.
- A RecyclerView. The scrolling list that contains the list items. An instance of RecyclerView as defined in the Activity layout file to act as the container for the View items.
- Layout for one item of data. All list items look the same, so you can use the same layout for all of them. The item layout has to be created separately from the Activity layout, so that one View item at a time can be created and filled with data.
- A layout manager. The layout manager handles the organization (layout) of user interface components in a View. Each ViewGroup has a layout manager. For LinearLayout, the Android system handles the layout for you. RecyclerView requires an explicit layout manager to manage the arrangement of list items contained within it. This layout could be vertical, horizontal, or a grid. The layout manager is an instance of Recyclerview.LayoutManager to organize the layout of the items in the RecyclerView.
- An adapter. Use an extension of RecyclerView.Adapter to connect your data to the RecyclerView. It prepares the data and how will be displayed in a ViewHolder. When the data changes, the adapter updates the contents of the respective list item view in the RecyclerView.
- A ViewHolder. Use an extension of RecyclerView.ViewHolder to contain the information for displaying one View item using the item’s layout. The diagram below shows the relationship between these components.
21.2.1. Data
Any displayable data can be shown in a RecyclerView.
- Text
- Images
- Icons Data can come from any source.
- Created by the app. For example, scrambled words for a game.
- From a local database. For example, a list of contacts.
- From cloud storage or the internet. For example news headlines.
21.2.2. RecyclerView
A RecyclerView is a ViewGroup for a scrollable container. It is Ideal for long lists of similar items.
A RecyclerView uses a limited number of View items that are reused when they go off-screen. This saves memory and makes it faster to update list items as the user scrolls through data, because it is not necessary to create a new View for every item that appears.
In general, the RecyclerView keeps as many View items as can fit on the screen, plus a few extra at each end of the list to make sure that scrolling is fast and smooth.
21.2.3. Item Layout
The layout for a list item is kept in a separate XML layout file so that the adapter can create View items and edit their contents independently from the layout of the Activity.
21.2.4. Layout Manager
A layout manager positions View items inside a ViewGroup, such as the RecyclerView, and determines when to reuse View items that are no longer visible to the user. To reuse (or recycle) a View, a layout manager may ask the adapter to replace the contents of the View with a different element from the dataset. Recycling View items in this manner improves performance by avoiding the creation of unnecessary View items or performing expensive findViewById() lookups.
RecyclerView provides these built-in layout managers:
- LinearLayoutManager shows items in a vertical or horizontal scrolling list.
- GridLayoutManager shows items in a grid.
- StaggeredGridLayoutManager shows items in a staggered grid. To create a custom layout manager, extend the RecyclerView.LayoutManager class.
21.2.5. Adapter
An adapter helps two incompatible interfaces to work together. In a RecyclerView, the adapter connects data with View items. It acts as an intermediary between the data and the View. The adapter receives or retrieves the data, does any work required to make it displayable in a View, and places the data in a View.
For example, the adapter may receive data from a database as a Cursor object, extract the the word and its definition, convert them to strings, and place the strings in a View item that has two TextView elements—one for the word and one for the definition. You will learn more about cursors in a later chapter.
The RecyclerView.Adapter implements a ViewHolder, and must override the following callbacks:
- onCreateViewHolder() inflates a View item and returns a new ViewHolder that contains it. This method is called when the RecyclerView needs a new ViewHolder to represent an item.
- onBindViewHolder() sets the contents of a View item at a given position in the RecyclerView. This is called by the RecyclerView, for example, when a new View item scrolls onto the screen.
- getItemCount() returns the total number of items in the data set held by the adapter.
21.2.6. ViewHolder
A RecyclerView.ViewHolder describes a View item and metadata about its place within the RecyclerView. Each ViewHolder holds one set of data. The adapter adds data to each ViewHolder for the layout manager to display.
You define your ViewHolder layout in an XML resource file. It can contain (almost) any type of View, including clickable elements.
21.3. Implementing a RecyclerView
Implementing a RecyclerView requires the following steps:
- Add the RecyclerView dependency if needed (depending on which template is used for the Activity).
- Add the RecyclerView to the Activity layout.
- Create a layout XML file for one View item.
- Extend RecyclerView.Adapter and implement the onCreateViewHolder() and onBindViewHolder() methods.
- Extend RecyclerView.ViewHolder to create a ViewHolder for your item layout. You can add click behavior by overriding the onClick() method.
- In the Activity, inside the onCreate() method, create a RecyclerView and initialize it with the adapter and a layout manager.
21.3.1. Adding the dependency
implementation 'androidx.recyclerview:recyclerview:1.1.0'
21.3.2. Adding a RecyclerView to the Activity layout
Add the RecyclerView to the Activity layout file:
 <androidx.recyclerview.widget.RecyclerView
        android:id="@+id/recyclerview"
        android:layout_width="match_parent"
        android:layout_height="match_parent"/>
21.3.3. Creating the layout for one item
Create an XML resource file and specify the layout of one item. The adapter uses this code to create the ViewHolder.
<LinearLayout xmlns:android="http://schemas.android.com/apk/res/android"
    android:layout_width="match_parent"
    android:layout_height="wrap_content"
    android:orientation="horizontal">

    <TextView
        android:id="@+id/emp_id"
        android:layout_width="0dp"
        android:layout_height="wrap_content"
        android:layout_weight="1"
        android:textColor="@android:color/black"
        android:textSize="20sp"
        android:textStyle="bold|italic" />

    <TextView
        android:id="@+id/emp_name"
        android:layout_width="0dp"
        android:layout_height="wrap_content"
        android:layout_weight="1"
        android:textColor="@android:color/holo_blue_dark"
        android:textSize="20sp"
        android:textStyle="bold" />

</LinearLayout>
21.3.4. Creating an adapter with a ViewHolder
Extend RecyclerView.Adapter and implement the onCreateViewHolder() and onBindViewHolder() methods.
Create a new Java class with the following signature:
import android.content.Context;
import android.view.LayoutInflater;
import android.view.View;
import android.view.ViewGroup;
import android.widget.TextView;

import androidx.annotation.NonNull;
import androidx.recyclerview.widget.RecyclerView;

import java.util.List;

class MyAdapter extends RecyclerView.Adapter<MyAdapter.MyViewHolder> {
    Context ct;
    List<String> myList;
    public MyAdapter(MainActivity mainActivity, List<String> list) {
        ct = mainActivity;
        myList = list;
    }

    @NonNull
    @Override
    public MyAdapter.MyViewHolder onCreateViewHolder(@NonNull ViewGroup parent, int viewType) {
        View v = LayoutInflater.from(ct).inflate(R.layout.one_row,parent,false);
        return new MyViewHolder(v);
    }

    @Override
    public void onBindViewHolder(@NonNull MyAdapter.MyViewHolder holder, int position) {
        holder.tv_id.setText(""+position);
        holder.tv_name.setText(myList.get(position));

    }

    @Override
    public int getItemCount() {
        return myList.size();
    }

    public class MyViewHolder extends RecyclerView.ViewHolder {

        TextView tv_id,tv_name;
        public MyViewHolder(@NonNull View itemView) {
            super(itemView);
            tv_id = itemView.findViewById(R.id.emp_id);
            tv_name = itemView.findViewById(R.id.emp_name);
        }
    }
}
XML Code
<?xml version="1.0" encoding="utf-8"?>
<androidx.constraintlayout.widget.ConstraintLayout xmlns:android="http://schemas.android.com/apk/res/android"
    xmlns:app="http://schemas.android.com/apk/res-auto"
    xmlns:tools="http://schemas.android.com/tools"
    android:layout_width="match_parent"
    android:layout_height="match_parent"
    tools:context=".MainActivity">


    <Button
        android:id="@+id/button"
        android:layout_width="wrap_content"
        android:layout_height="wrap_content"
        android:text="Update List"
        android:onClick="updateList"
        app:layout_constraintBottom_toBottomOf="parent"
        app:layout_constraintEnd_toEndOf="parent"
        app:layout_constraintStart_toStartOf="parent" />

    <androidx.recyclerview.widget.RecyclerView
        android:id="@+id/recyclerview"
        android:layout_width="0dp"
        android:layout_height="0dp"
        app:layoutManager="androidx.recyclerview.widget.LinearLayoutManager"
        android:orientation="vertical"
        app:layout_constraintBottom_toTopOf="@+id/button"
        app:layout_constraintEnd_toEndOf="parent"
        app:layout_constraintStart_toStartOf="parent"
        app:layout_constraintTop_toTopOf="parent" />

</androidx.constraintlayout.widget.ConstraintLayout>
Java Code
public class MainActivity extends AppCompatActivity {

    RecyclerView rv;
    List<String> list;

    @Override
    protected void onCreate(Bundle savedInstanceState) {
        super.onCreate(savedInstanceState);
        setContentView(R.layout.activity_main);
        rv = findViewById(R.id.recyclerview);
        list = new ArrayList<>();
        list.add(0,"Mastan Vali");
        list.add(1,"Pavan Kumar Reddy ");
        list.add(2,"Sai Sankar");
        list.add(3,"Anusha");
        list.add(4,"Muneiah");
        list.add(5,"PSV Krishna");
        list.add(6,"VaraPrasad");
        list.add(7,"Siva Prasad B");
        list.add(8,"Chaitanya");
        list.add(9,"Gopal V");
        rv.setLayoutManager(new LinearLayoutManager(this));
        rv.setAdapter(new MyAdapter(this,list));
    }

    public void updateList(View view) {
        list.set(0,"Khaleel");
        rv.setAdapter(new MyAdapter(this,list));

    }
}