34. Espresso Testing In Android
Espresso is an open source android user interface (UI) testing framework developed by Google. The term Espresso is of Italian origin, meaning Coffee. Espresso is a simple, efficient and flexible testing framework. This tutorial walks you through the basics of Espresso framework, how to setup Espresso framework in a project, work flow of the framework and finding, automating & asserting user interface components in the testing environment with simple android application. In general, mobile automation testing is a difficult and challenging task. Android availability for different devices and platforms makes it things tedious for mobile automation testing. To make it easier, Google took on the challenge and developed Espresso framework. It provides a very simple, consistent and flexible API to automate and test the user interfaces in an android application. Espresso tests can be written in both Java and Kotlin, a modern programming language to develop android application.
The Espresso API is simple and easy to learn. You can easily perform Android UI tests without the complexity of multi-threaded testing. Google Drive, Maps and some other applications are currently using Espresso.
34.1. Features of Espresso
Some the salient features supported by Espresso are as follow,
- Very simple API and so, easy to learn.
- Highly scalable and flexible.
- Provides separate module to test Android WebView component.
- Provides separate module to validate as well as mock Android Intents.
- Provides automatic synchronization between your application and tests.
34.2. Advantages of Espresso
Let us now what the benefits of Espresso are.
- Backward compatibility
- Easy to setup.
- Highly stable test cycle.
- Supports testing activities outside application as well.
- Supports JUnit4
- UI automation suitable for writing black box tests.
let us understand how to install espresso framework, configure it to write espresso tests and execute it in our android application.
34.3. Prerequisites
Espresso is a user interface-testing framework for testing android application developed in Java / Kotlin language using Android SDK. Therefore, espresso’s only requirement is to develop the application using Android SDK in either Java or Kotlin and it is advised to have the latest Android Studio.
The list of items to be configured properly before we start working in espresso framework is as follows −
- Install latest Java JDK and configure JAVA_HOME environment variable.
- Install latest Android Studio (version 3.2. or higher).
- Install latest Android SDK using SDK Manager and configure ANDROID_HOME environment variable.
- Install latest Gradle Build Tool and configure GRADLE_HOME environment variable.
34.4. Configure EspressoTesting Framework
Initially, espresso testing framework is provided as part of the Android Support library. Later, the Android team provides a new Android library, AndroidX and moves the latest espresso testing framework development into the library. Latest development (Android 9.0, API level 28 or higher) of espresso testing framework will be done in AndroidX library.
Including espresso testing framework in a project is as simple as setting the espresso testing framework as a dependency in the application gradle file, app/build.gradle. The complete configuration is as follow,
Using Android support library,
android {
   defaultConfig {
      testInstrumentationRunner "android.support.test.runner.AndroidJUnitRunner"
   }
}
dependencies {
   testImplementation 'junit:junit:4.12'
   androidTestImplementation 'com.android.support.test:runner:1.0.2'
   androidTestImplementation 'com.android.support.test.espresso:espressocore:3.0.2'
}
Using AndroidX library,
android {
   defaultConfig {
      testInstrumentationRunner "androidx.test.runner.AndroidJUnitRunner"
   }
}
dependencies {
   testImplementation 'junit:junit:4.12'
   androidTestImplementation 'com.androidx.test:runner:1.0.2'
   androidTestImplementation 'com.androidx.espresso:espresso-core:3.0.2'
}
35. 1. The Espresso test framework
Espresso has basically three components:
ViewMatchers - allows to find view in the current view hierarchy
ViewActions - allows to perform actions on the views
ViewAssertions - allows to assert state of a view
The case construct for Espresso tests is the following:
35.1. Base Espresso Test
onView(ViewMatcher)  1
 .perform(ViewAction) 2
   .check(ViewAssertion); 3
1.Finds the view 2.Performs an action on the view 3.Validates a assertioin
The following code demonstrates the usage of the Espresso test framework.
import static android.support.test.espresso.Espresso.onView;
import static android.support.test.espresso.action.ViewActions.click;
import static android.support.test.espresso.assertion.ViewAssertions.matches;
import static android.support.test.espresso.matcher.ViewMatchers.isDisplayed;
import static android.support.test.espresso.matcher.ViewMatchers.withId;

// image more code here...

// test statement
onView(withId(R.id.my_view))            // withId(R.id.my_view) is a ViewMatcher
        .perform(click())               // click() is a ViewAction
        .check(matches(isDisplayed())); // matches(isDisplayed()) is a ViewAssertion

// new test
onView(withId(R.id.greet_button))
.perform(click())
.check(matches(not(isEnabled()));
36. 2. Making Espresso available
36.1. 2.1. Installation
Use the Android SDK manager to install the Android Support Repository.
 a1
a1
36.2. 2.2. Configuration of the Gradle build file for Espresso
To use Espresso for your tests, add the following dependency to the Gradle build file of your app.
dependencies {
    implementation fileTree(dir: 'libs', include: ['*.jar'])

    testImplementation 'junit:junit:4.12'

    // Android runner and rules support
    androidtestImplementation 'com.android.support.test:runner:0.5'
    androidtestImplementation 'com.android.support.test:rules:0.5'

    // Espresso support
    androidtestImplementation('com.android.support.test.espresso:espresso-core:2.2.2', {
        exclude group: 'com.android.support', module: 'support-annotations'
    })

    // add this for intent mocking support
    androidtestImplementation 'com.android.support.test.espresso:espresso-intents:2.2.2'

    // add this for webview testing support
    androidtestImplementation 'com.android.support.test.espresso:espresso-web:2.2.2'

}
Ensure that the android.support.test.runner.AndroidJUnitRunner is specified as value for the testInstrumentationRunner parameter in the build file of your app. Via the packagingOptions you may have to exclude LICENSE.txt, depending on the libraries you are using. The following listing is an example for that.
apply plugin: 'com.android.application'

android {
    compileSdkVersion 22
    buildToolsVersion '22.0.1'
    defaultConfig {
        applicationId "com.example.android.testing.espresso.BasicSample"
        minSdkVersion 10
        targetSdkVersion 22
        versionCode 1
        versionName "1.0"

        testInstrumentationRunner "android.support.test.runner.AndroidJUnitRunner"
    }
    packagingOptions {
        exclude 'LICENSE.txt'
    }
    lintOptions {
        abortOnError false
    }
}

dependencies {
    // as before.......
}
36.3. 2.3. Device settings
It is recommended to turn of the animation on the Android device which is used for testing. Animations might confusing Espressos check for ideling resources.
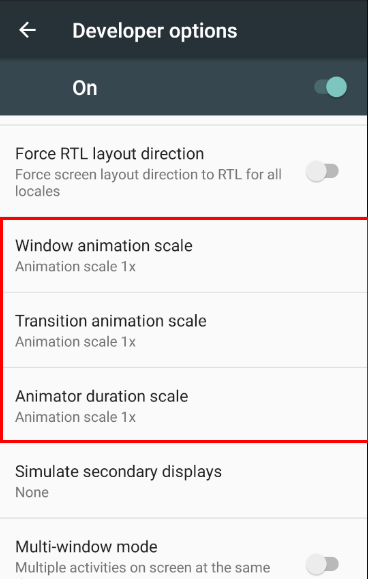 a2
a2
37. 3. Exercise: A first Espresso test
37.1. 3.1. Create project under test
Create a new Android project called Espresso First with the package name com.vogella.android.espressofirst. Use the Blank Template as basis for this project.
Change the generated activity_main.xml layout file to the following.
<LinearLayout xmlns:android="http://schemas.android.com/apk/res/android"
    xmlns:tools="http://schemas.android.com/tools"
    android:layout_width="match_parent"
    android:layout_height="match_parent"
    >

    <EditText
        android:id="@+id/inputField"
        android:layout_width="wrap_content"
        android:layout_height="wrap_content" />

    <Button
        android:id="@+id/changeText"
        android:layout_width="wrap_content"
        android:layout_height="wrap_content"
        android:text="New Button" android:onClick="onClick"/>

    <Button
        android:id="@+id/switchActivity"
        android:layout_width="wrap_content"
        android:layout_height="wrap_content"
        android:text="Change Text" android:onClick="onClick"/>
</LinearLayout>
Create a new file called activity_second.xml.
<?xml version="1.0" encoding="utf-8"?>
<LinearLayout xmlns:android="http://schemas.android.com/apk/res/android"
    android:orientation="vertical" android:layout_width="match_parent"
    android:layout_height="match_parent">

    <TextView
        android:layout_width="wrap_content"
        android:layout_height="wrap_content"
        android:textAppearance="?android:attr/textAppearanceLarge"
        android:text="Large Text"
        android:id="@+id/resultView" />
</LinearLayout>
Create a new activity with the following code.
package com.vogella.android.espressofirst;

import android.app.Activity;
import android.content.Intent;
import android.os.Bundle;
import android.view.View;
import android.widget.TextView;

public class SecondActivity extends Activity{
    @Override
    protected void onCreate(Bundle savedInstanceState) {
        super.onCreate(savedInstanceState);
        setContentView(R.layout.activity_second);
        TextView viewById = (TextView) findViewById(R.id.resultView);
        Bundle inputData = getIntent().getExtras();
        String input = inputData.getString("input");
        viewById.setText(input);
    }
}
Also adjust your MainActivity class.
package com.vogella.android.espressofirst;

import android.app.Activity;
import android.content.Intent;
import android.os.Bundle;
import android.view.View;
import android.widget.EditText;

public class MainActivity extends Activity {

    EditText editText;

    @Override
    protected void onCreate(Bundle savedInstanceState) {
        super.onCreate(savedInstanceState);
        setContentView(R.layout.activity_main);

        editText = (EditText) findViewById(R.id.inputField);
    }


    public void onClick(View view) {
        switch (view.getId()) {
            case R.id.changeText:
                editText.setText("Lalala");
                break;
            case R.id.switchActivity:
                Intent intent = new Intent(this, SecondActivity.class);
                intent.putExtra("input", editText.getText().toString());
                startActivity(intent);
                break;
        }

    }
}
37.2. 3.2. Adjust the app build.gradle
Perform the setting as described in Configuration of the Gradle build file for Espresso.
37.3. 3.3. Create your Espresso test
package com.vogella.android.espressofirst;

import android.support.test.rule.ActivityTestRule;
import android.support.test.runner.AndroidJUnit4;

import org.junit.Rule;
import org.junit.Test;
import org.junit.runner.RunWith;

import static android.support.test.espresso.Espresso.onView;
import static android.support.test.espresso.action.ViewActions.click;
import static android.support.test.espresso.action.ViewActions.closeSoftKeyboard;
import static android.support.test.espresso.action.ViewActions.typeText;
import static android.support.test.espresso.assertion.ViewAssertions.matches;

import static android.support.test.espresso.matcher.ViewMatchers.withId;
import static android.support.test.espresso.matcher.ViewMatchers.withText;


@RunWith(AndroidJUnit4.class)
public class MainActivityEspressoTest {


    @Rule
    public ActivityTestRule<MainActivity> mActivityRule =
        new ActivityTestRule<>(MainActivity.class);

    @Test
    public void ensureTextChangesWork() {
        // Type text and then press the button.
        onView(withId(R.id.inputField))
                .perform(typeText("HELLO"), closeSoftKeyboard());
        onView(withId(R.id.changeText)).perform(click());

        // Check that the text was changed.
        onView(withId(R.id.inputField)).check(matches(withText("Lalala")));
    }

    @Test
    public void changeText_newActivity() {
        // Type text and then press the button.
        onView(withId(R.id.inputField)).perform(typeText("NewText"),
                closeSoftKeyboard());
        onView(withId(R.id.switchActivity)).perform(click());

        // This view is in a different Activity, no need to tell Espresso.
        onView(withId(R.id.resultView)).check(matches(withText("NewText")));
    }
}
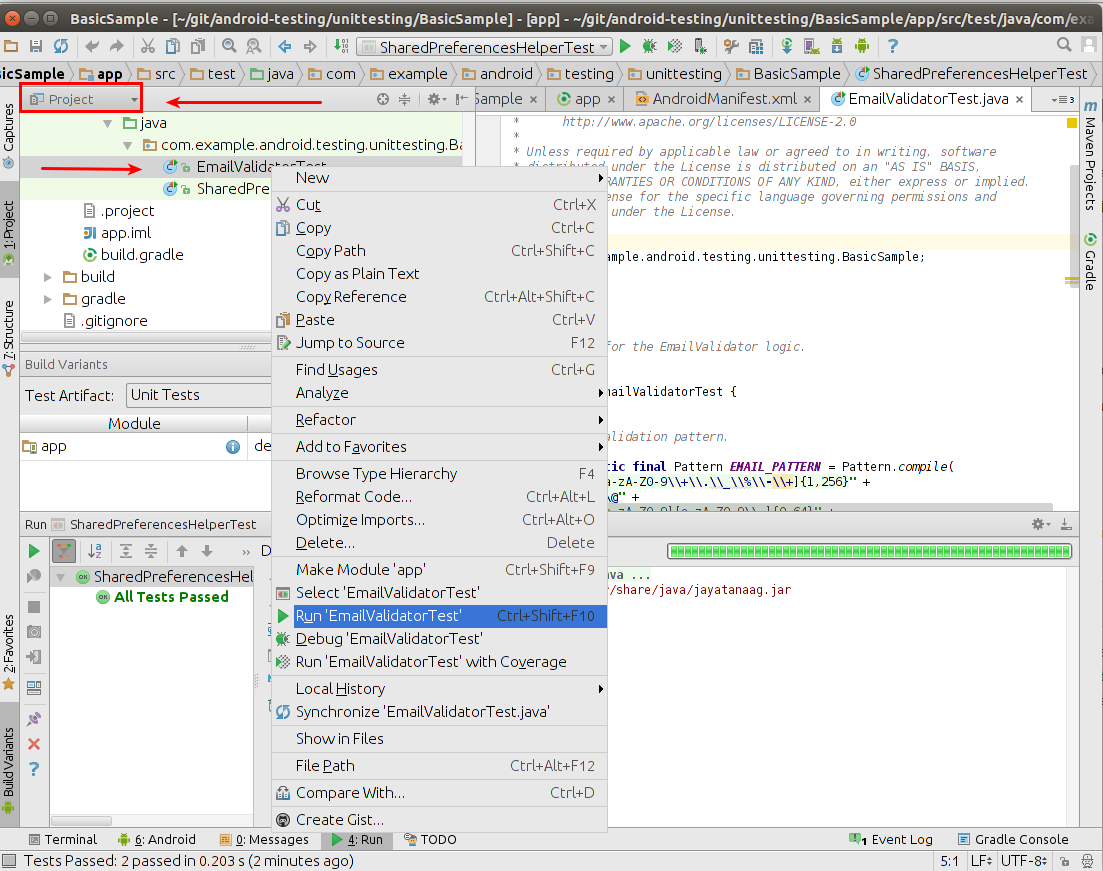
37.4. 3.4. Run your test
Right-click on your test and select Run. See Running Espresso tests for details.
38. 4. More on writing Espresso unit tests
38.1. 4.1. Location of Espresso tests and required static imports
Espresso tests must be placed in the app/src/androidTest folder.
To simplify the usage of the Espresso API it is recommended to add the following static imports. This allows to access these methods without the class prefix.
import static android.support.test.espresso.Espresso.onView;
import static android.support.test.espresso.action.ViewActions.click;
import static android.support.test.espresso.action.ViewActions.closeSoftKeyboard;
import static android.support.test.espresso.action.ViewActions.typeText;
import static android.support.test.espresso.assertion.ViewAssertions.matches;
import static android.support.test.espresso.matcher.ViewMatchers.withId;
import static android.support.test.espresso.matcher.ViewMatchers.withText;
38.2. 4.2. Using ViewMatcher
To find a view, use the onView() method with a view matcher which selects the correct view. If you are using an AdapterView use the onData() method instead of the onView() method. The The onView() methods return an object of type ViewInteraction. The onData() method returns an object of type DataInteraction.
The following table describes the available matchers.
Table 1. Espresso matchers
 mi
mi
38.3. 4.3. Performing Actions
ViewInteraction and DataInteraction allow to specify an action for test via an object of type ViewAction via the perform method. The ViewActions class provides helper methods for the most common actions, like:
- ViewActions.click
- ViewActions.typeText()
- ViewActions.pressKey()
- ViewActions.clearText()
The perform method returns again an object of type ViewInteraction on which you can perform more actions or validate the result. It also uses varags as argument, i.e, you can pass several actions at the same time to it.
38.4. 4.4. Verifying test results
Call the ViewInteraction.check() method to assert a view state. This method expects a ViewAssertion object as input. The ViewAssertions class provides helper methods for creating these objects:
matches - Hamcrest matcher
doesNotExist - asserts that the select view does not exist
You can use the powerful Hamcrest matchers. The following gives a few examples:
onView(withText(startsWith("ABC"))).perform(click()); 1

onView(withText(endsWith("YYZZ"))).perform(click()); 2

onView(withId(R.id.viewId)).check(matches(withContentDescription(containsString("YYZZ")))); 3

onView(withText(equalToIgnoringCase("xxYY"))).perform(click()); 4
 -
onView(withText(equalToIgnoringWhiteSpace("XX YY ZZ"))).perform(click()); 5

onView(withId(R.id.viewId)).check(matches(withText(not(containsString("YYZZ"))))); 6
1.Matches a view which text starts with “ABC” pattern 2.Matches a view which text ends with “YYZZ” pattern 3.Matches that the text of the view with specified R.id has content description which contains “YYZZ” string anywhere 4.Matches a view which text is equal to the specified string, ignoring case: 5.Matches a view which text is equal to the specified text when whitespace differences are (mostly) ignored 6.Matches that text of a particular view with specified R.id does not contain “YYZZ” string
38.5. 4.5. Access to the instrumentation API
Via the InstrumentationRegistry.getTargetContext() you have access to the target context of your application. For example, if you want to use the id without using R.id you can use the following helper method to determine it.
package testing.android.vogella.com.asynctask;

import android.content.Context;
import android.support.test.InstrumentationRegistry;
import android.support.test.rule.ActivityTestRule;
import android.support.test.runner.AndroidJUnit4;

import org.junit.Rule;
import org.junit.Test;
import org.junit.runner.RunWith;

import static android.support.test.espresso.Espresso.onView;
import static android.support.test.espresso.action.ViewActions.click;
import static android.support.test.espresso.assertion.ViewAssertions.matches;
import static android.support.test.espresso.matcher.ViewMatchers.withId;
import static android.support.test.espresso.matcher.ViewMatchers.withText;

@RunWith(AndroidJUnit4.class)
public class EspressoTest {

    @Rule
    public ActivityTestRule<MainActivity> mActivityRule =
            new ActivityTestRule<>(MainActivity.class);

    @Test
    public void buttonShouldUpdateText(){
        onView(withId(R.id.update)).perform(click());
        onView(withId(getResourceId("Click"))).check(matches(withText("Done")));
    }

    private static int getResourceId(String s) {
        Context targetContext = InstrumentationRegistry.getTargetContext();
        String packageName = targetContext.getPackageName();
        return targetContext.getResources().getIdentifier(s, "id", packageName);
    }
}
38.6. 4.6. Configuring the start intent for the activity
If you specify false as third parameter in the ActivityTestRule, you can configure the intent for starting the activity. This is as demonstrated in the following code example.
package com.vogella.android.testing.espressosamples;

import android.content.Intent;
import android.support.test.rule.ActivityTestRule;
import android.support.test.runner.AndroidJUnit4;

import org.junit.Rule;
import org.junit.Test;
import org.junit.runner.RunWith;

import static android.support.test.espresso.Espresso.onView;
import static android.support.test.espresso.assertion.ViewAssertions.matches;
import static android.support.test.espresso.matcher.ViewMatchers.withId;
import static android.support.test.espresso.matcher.ViewMatchers.withText;

@RunWith(AndroidJUnit4.class)
public class SecondActivityTest {

    @Rule
    // third parameter is set to false which means the activity is not started automatically
    public ActivityTestRule<SecondActivity> rule =
        new ActivityTestRule(SecondActivity.class, true, false);

    @Test
    public void demonstrateIntentPrep() {
        Intent intent = new Intent();
        intent.putExtra("EXTRA", "Test");
        rule.launchActivity(intent);
        onView(withId(R.id.display)).check(matches(withText("Test")));
    }
}
38.7. 4.7. Adapter views
AdapterView is a special type of widget that loads its data dynamically from an adapter. Only a subset of the data has real views in the current view hierarchy. A onView() search would not find views for them. onData can be used to interactive with adapter views, like ListView. The following gives a few examples.
// click on an item of type String in a spinner
// afterwards verify that the view with the R.id.spinnertext_simple id contains "Eclipse"
onData(allOf(is(instanceOf(String.class)), is("Eclipse"))).perform(click());
onView(withId()).check(matches(withText(containsString("Eclipse")))); // normal view not adapter view

onData(allOf(is(instanceOf(Map.class)), hasEntry(equalTo("STR"), is("item: 50"))).perform(click());

onData(withItemContent("item: 60")).onChildView(withId(R.id.item_size)).perform(click());
38.8. 4.8. Espresso testing with permissions
Via instrumentation you can grand your tests the permission to execute.
@Before
public void grantPermission() {
    if (Build.VERSION.SDK_INT >= Build.VERSION_CODES.M) {
        getInstrumentation().getUiAutomation().executeShellCommand(
                "pm grant " + getTargetContext().getPackageName()
                        + " android.permission.CALL_PHONE");
    }
}
38.9. 4.9. Espresso UI recorder
Android Studio provides an Run Record Espresso Test menu entry which allows you to record the interaction with your application and create a Espresso test from it.
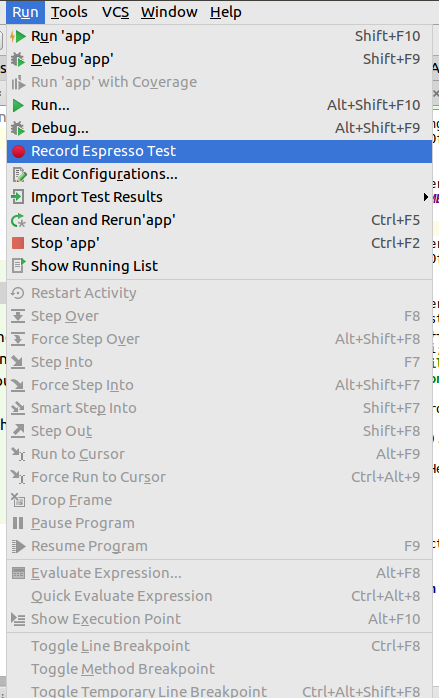 a3
a3
 a4
a4
38.10. 4.10. Configuring the activity under test
You can also access the activity object which you are testing and call methods on it. For example, assume you want to call a method on your activity.
public class MainActivity extends Activity {

    @Override
    protected void onCreate(Bundle savedInstanceState) {
        super.onCreate(savedInstanceState);
        setContentView(R.layout.activity_main);
    }
    public void configureMainActivity(String Uri) {
        // do something with this
    }
}
This configureMainActivity can be called in your test.
package com.vogella.android.myapplication;

import android.support.test.rule.ActivityTestRule;
import android.support.test.runner.AndroidJUnit4;

import org.junit.Rule;
import org.junit.Test;
import org.junit.runner.RunWith;

@RunWith(AndroidJUnit4.class)

public class ExampleInstrumentedTest {

    @Rule
    public ActivityTestRule<MainActivity> mActivityRule =
            new ActivityTestRule<MainActivity>(MainActivity.class);

    @Test
    public void useAppContext() throws Exception {
        MainActivity activity = mActivityRule.getActivity();
        activity.configureMainActivity("https://www.vogella.com/");
        // do more
    }
}
You can also override methods in ActivityTestRule, for exmaple the beforeActivityLaunched and afterActivityLaunched methods. You can also access the current activity.
@Test
public void navigate() {

        Activity instance = getActivityInstance();
        onView(withText("Next")).perform(click());
        Activity activity = getActivityInstance();
        boolean b = (activity instanceof  SecondActivity);
        assertTrue(b);
        // do more
    }

    public Activity getActivityInstance() {
        final Activity[] activity = new Activity[1];
        InstrumentationRegistry.getInstrumentation().runOnMainSync(new Runnable( ) {
            public void run() {
                Activity currentActivity = null;
                Collection resumedActivities = ActivityLifecycleMonitorRegistry.getInstance().getActivitiesInStage(RESUMED);
                if (resumedActivities.iterator().hasNext()){
                    currentActivity = (Activity) resumedActivities.iterator().next();
                    activity[0] = currentActivity;
                }
            }
        });

        return activity[0];
    }
- Allows to access the currently active activity.
 aaa
aaa